Furniture

DIY Channel Tuft Banquette Bench How-To


DIY Channel Tuft Banquette Bench How-To

I know a lot of people wanted to know how we upholstered our banquette bench from our Fall 2020 One Room challenge project, so this post is for you my friends!

First…look at some pretty pictures. Isn’t it lovely!??

Modern Vintage Yellow FLoral Kitchen Wallpaper DIY Channel Tufted Banquette Bench (1).jpg
Channel Tufted Banquette Bench Yellow Kitchen Cabinets floral kitchen wallpaper (1).jpg

Not only is it lovely, it is COMFORTABLE! I love sitting there, and now it’s my favorite place to sit on the computer and work before the savages wake up.

Please note, that we had the bench and drawers made by our friends at Re.Dwell because we didn’t have time to deal with that. You could do something similar by using an Ikea Besta series with drawers for the bench and putting some wood on top and for the back, and then pick up my directions here.

What you need

  • a bench

  • 1/4” plywood cut to size

  • staple gun (and huge amount of staples)

  • batting found at joanns or hobby lobby

  • High Density Foam (Joanns or Hobby Lobby)

    • 3” Foam for bench

    • 1” foam for back

  • Whatever fabric you’re using

  • Industrial Velcro

There are a lot of ways you could do this. You could just upholster some foam like a pillow, and throw it up on the bench. I wanted a custom upholstered look, like at a fancy restaurant, so I figured out how to do that (it wasn’t hard).

Since the bench was sturdy, the wood I used as backing for the upholstery, didn’t have to be. We didn’t want a lot of extra bulk, so we went with 1/4” plywood (the cheap stuff). We (the husband), cut the plywood into the size of the bench- making it slighttttlllly smaller than actual bench to account for fabric and batting.

Steps to DIY upholstered Banquette Bench

  • cut the foam to match the size of your plywood

  • wrap batting around foam and wood, pull tight and staple (make sure you have extra batting on the edge that will be the front edge of bench)

  • now take the fabric you’re using to upholster (we used a faux leather to make clean up easy) and upholster the sides first and then the back of bench, leaving the front edge UN-STAPLED

DIY how to Upholster a channel tuft banquette bench.jpg
DIY how to Upholster a channel tuft banquette bench (3).jpg
  • Now you can take the upholstered piece of plywood to your bench. I used heavy duty velcro to attach the plywood to the bench. I wanted to be able to change it out if I needed to without too much trouble.

built in upholstered banquette bench DIY.jpg
Built in banquette bench upholstery DIY Grand Rapids Interior Design.jpg
  • Do not fold the batting underneath the plywood- you want the batting to come out towards the front of the bench so you can fold it over the ledge of the bench like in picture (this is what will give you the ability to make it look more built in)

  • Staple the batting along the whole length of under the ledge of the bench.

  • Then I pulled the black fabric tight and wrapped it over the batting and stapled it underneath the edge of the bench. (the corners took a few trys to fold and get right because of the extra fabric, but it’s not hard to get the staples out and do it over)

DIY Banquette Bench Upholstery Built in upholstered bench channel tuft back.jpg

Here we are ready to upholster the back of the bench! (this can still be done if you don’t have a back to your bench- you just need to use 1” thick boards instead of the 1/4” plywood and attach to wall with a french cleat.)

How to DIY Upholster a Channel Tufted Banquette

  • The steps for these are very similar to the bench, except more time consuming because there are so many more pieces involved

  • You need 1” foam, batting, and 1/4” plywood

  • First wrap the batting around foam and plywood pulling tight- this give you the rounded edges

  • Then wrap fabric around and staple away

  • If you are using patterned fabric, number the backs of your pieces of wood so you can keep the pattern repeat in order.

DIY Channel Tuft Upholstered Banquette.jpg
DIY Channel Tuft Upholstered Banquette (2).jpg
DIY Channel Tuft Upholstered Banquette (3).jpg

For this bench, we used 4” wide boards that were 26” high (would’ve gone higher if the window trim wasn’t there). If you want to make less work for yourself, you can go with 5” or 6” wide boards.

DIY Channel Tuft Upholstered Banquette (5).jpg

First I organized the boards onto the back of bench. Because the bench was upholstered almost all the way to the back, I was able to squish them a little bit in between black upholstered foam and the back of the bench.

I put pieces of velcro on each board and stuck it in place.

Grand Rapids Interior Design Channel Tufted Banquette Bench.jpg

With the velcro, I can easily remove one board and reupholster if it gets ruined, and I can also easily pull out the board if I want to use that outlet behind.

Important- If you do not have an angled bench back board to velcro individual boards to, you need to use 1” thick boards to upholster individually-

DIY Channel Tuft Banquette Bench.jpg

Then you will line them all up together like in the above picture, and use 2 thin boards (imagine level is a board) and screw into each piece of upholstered board so that they are all stuck together. Then you can attach a french cleat to back of upholstered boards and hang on wall.

Yellow built in banquette bench black and white channel tufted banquette seating.jpg

And there you have it- your very own, super comfy, super pretty channel tufted, upholstered bench.

(If you look close, you can see some batting sticking out under the bench edge…it’s on the to-do list someday to glue a small piece of fabric up there to cover it up….but if I were a betting woman, that probably never happens.

Black Zellige kitchen backsplash Channel Tufted Banquette Bench Yellow Kitchen Cabinets floral kitchen wallpaper (2).jpg
Modern Vintage Yellow FLoral Kitchen Wallpaper DIY Channel Tufted Banquette Bench Grand Rapids Interior Designer Susannah Watts.jpg

Let me know if you have any questions!


How Hiring an Interior Designer can save you money


“WHAT?!” you’re saying.  There is no way that hiring one more person is going to save me anything.  I’m already spending 19 million dollars (we all exaggerate a little bit) on this renovation/new build/decoration project.

How is paying someone thousands of dollars going to SAVE me money?

This mudroom walkthrough would’ve never happened with just the contractor and architects plans.

This mudroom walkthrough would’ve never happened with just the contractor and architects plans.

If you have the budget to do the above project- (whatever it may be), then you have the budget to hire a designer. You’ll get the best bang from your buck if you start the process with a designer in the beginning of the project….and not midway through after a bunch of mistakes have been made and now you need someone to fix it. 

A designer can steer you away from costly mistakes:

Did you go out and buy a bunch of appliances for your kitchen renovation because they were on sale without knowing if they would fit?  Oops.  Now you’ve got to return them all (and usually lose money). 

Forget to make sure there was enough of a walkway to get to your toilet?  That’s okay….you can spent the next twenty years on the loo trying to make yourself fit or pay to fix it.  Oops! No one thought to make sure you could open up your oven all the way.   

What’s more functional? Two shower niche’s that can fit full bottles of shampoo or only one?

What’s more functional? Two shower niche’s that can fit full bottles of shampoo or only one?

Now…this isn’t to say that designers never make mistakes.  But designers have experience that you don’t.  (How did they get that experience?  By making mistakes.) 

There are some mistakes that even all the experience in the world can’t fix….patterns, textures, surfaces, colors- this is something that some people don’t learn or can’t learn.  And it would be terrible to pick all these expensive items out for your bathroom renovation and then realize they look horrible together! (this is why it’s important to hire a designer with a good eye AND good taste)

Help you pick and vet contractors/architects: 

A designer can help you with the questions you ask a contractor to make sure they are reliable and know what they’re doing and not ripping you off while they’re doing it.  Businesses practices in this industry can be very opaque (to put it politely) and a designer can raise a red flag if someone is promising too much for too cheap or trying to charge you $300/sqf for laminate countertops.  They can also let you know which contractors might have a history of very bad work…like installing a dryer without venting it to the outside. 

Reuse & Recycle Interior Decor:

Did you think you were going to have to throw away all your furniture? A designer has the eye to see which items can be refinished or reupholstered and still used in your project.  It’s usually cheaper for you, and better for the environment!

This couch was a beat up 100 year old couch that we reupholstered and re-foamed to get a brand new look .

This couch was a beat up 100 year old couch that we reupholstered and re-foamed to get a brand new look .

Interior Designers Have Better Prices

Designers usually have a relationship with a vendor and receive better pricing on items.  Depending on their business model, sometimes they will extend some of that discount to their clients.   Our company shares our trade discounts with our clients- we want our clients to get the best bang for their buck, so clients will get a cheaper price than MSRP (which makes them happy), and we also are making money (which makes us happy).

Designers Can Make Your Money Go Further:

Any designer worth his/her salt,  (I’m not exactly sure how much salt is worth, so maybe take that statement with a grain of the above mentioned entity) will be able to tell you when you should splurge and when you can save.  You don’t always need the most expensive item to still have an amazing space.  Sometimes Ikea & Target mixed with a ridiculously expensive rug make a better pair than everything expensive.

This is a Target chair (on left) mixed with an original Adrian Pearsall MCM chair that has been reupholstered.

This is a Target chair (on left) mixed with an original Adrian Pearsall MCM chair that has been reupholstered.

Maximize Your Investment:

If you’re ever planning on selling your house, a designer can help you figure out the best way to maximize your money to get the best result when you sell.  Boring doesn’t always sell quicker or better. 

Save On Therapy Costs After A Renovation:  

Trust us…if you’re working full time and then coming home and trying to design a house in your spare time, you’re gonna need some therapy at some point because of the stress and mental breakdown.  (we’ve worked full time and designed a house in our after hours, so we know this one).  Therapy is expensive and takes up a lot of time, so it’s easier just to hire someone else from the get go. 


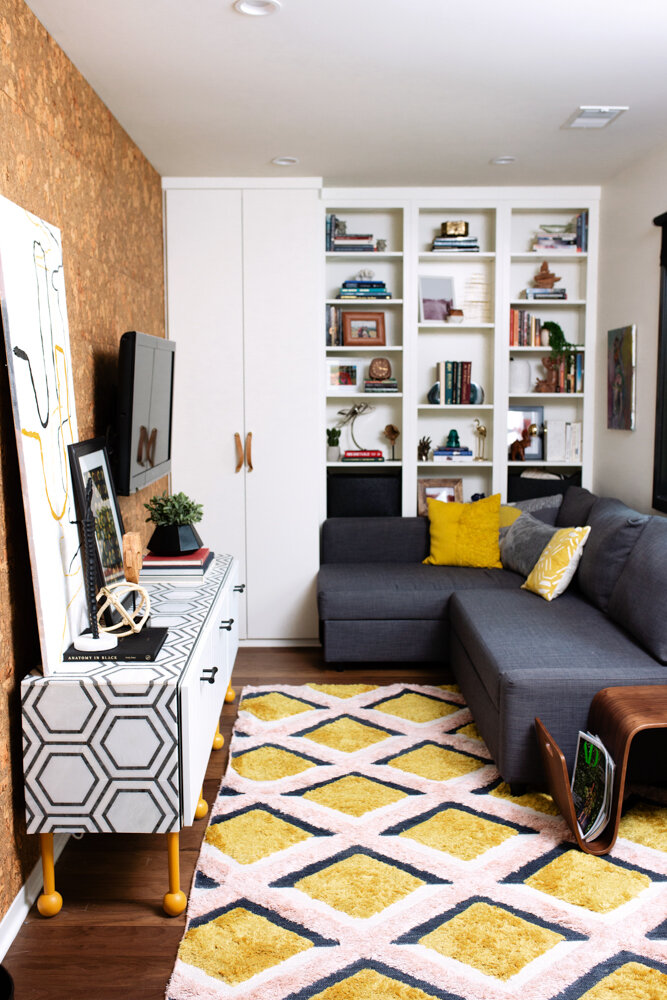
Hex Tile Besta Ikea Console Hack


Hex Tile Ikea Besta Console Hack

I wanted to create something custom and unique that almost anyone could copy without having to have a bunch of skills.  You need some skills, but not a bunch. 

Call it a console, a media cabinet, a buffet, call it whatever you want as long it’s pretty.

39.corkwall.credenza.modernart.grandrapids - Copy.jpg

To hack this, you don’t need to be an expert wood worker.  For this particular version, you would need to be able to tile…or you would need to be able to pick up the phone and dial a number and find someone to tile it for you, like I did.  

Generic storage unit we had before

Generic storage unit we had before

If the tile you use is not expensive, and you want a custom look, it is still much cheaper to hire someone than it would be to buy a custom console.  

Other options to give the top a different look is a cool piece of wood or some funky wallpaper. 

How we made this particular console.

The process

The process

In order to keep the tile flat and not have it potentially buckle if the console itself became unlevel, we first put james hardie cement backer board on the top and sides.  (look close at this pic and you can see the screws and cement board- we lost some pics of the process in a deleting accident.)

IMG_9045.jpg

Then came the tiling part.

Due to the particular tile we picked and some of the small pieces it had, it would’ve been extremely difficult, if not impossible to to miter the edges at a 45 degree angle to have a true waterfall edge.  So we did the next best thing and made sure the pattern lined up.   

44.tiled.credenza.mustardrug.jpg

We used a black schluter strip in black to edge the tile and hide the cement backer board.

We bought legs from pretty pegs in a fun color.  We started with 4 legs, but with the weight of the tile, we needed to add 4 more legs in the middle so it didn’t sag in the middle.

Swatt_Co_Lowres-65.jpg

These legs were the 17” legs from pretty pegs, which we like the look of better, but it made the console a little too tall for the space, and a little more wobbly than we liked considering this was going to be used for kids toys, and we didn’t want the kids to yank a drawer open and topple it over on them. 

If this wasn’t being used by kids a lot, I would’ve felt comfortable keeping them as is.  But since it is being used for kids, and we sort of like our kids most of the time, we figured we didn’t want them to die in a freak furniture accident, so we cut the legs shorter.  (and by we, I mean my husband). 

40.styled.credenza.corkwall.michigan.interiordesign - Copy.jpg

If pretty pegs doesn’t have a color you like, paint them! They paint really easily!  We bought the first 4 in yellow ochre and then by the time we realized we needed 4 more, they weren’t selling yellow anymore, so I ordered some wood ones, and got a custom match at the paint shop and I can barely even tell which leg is which!

Swatt_Co_Lowres-78.jpg

We moved it into our house and set pretty things on top and a bunch of ugly plastic toys inside and called it a day. 

If you have any questions, ask below in the comments!