Gucci Grandma Kitchen: One Room Challenge Reveal

Gucci Grandma Kitchen: One Room Challenge Reveal

We. Are. Done.

Done. Done. Done with our second One Room Challenge.

Yellow vintage floral wallpaper black wall green kartell lucite pendant.jpg

(well…we still have to actually put all of our junk that is currently in bins all over our living room into the mudroom cabinets…but that seems like a good job for a Saturday afternoon with a cocktail in hand).

ORC.Logo.jpeg

First off- we want to thank Linda from Calling It Home and Better Homes and Gardens for hosting the One Room Challenge. Without them, there is NO WAY we would’ve had neither the motivation nor the drive to finish this in 7 weeks.

A big shout out and thank you to Belwith-Keeler for sponsoring this project and providing cabinet hardware for the kitchen and mudroom.

And let’s not forget to thank our talented photographer Dionel, from The Mittentog…without whom we would be left with our 3 year old to take the pictures.

Kitchen & Mudroom you ask? I thought this was a ONE room challenge? My brain works in funny ways…I hear One Room Challenge and my brain says, “Why don’t you decide to do 3 rooms?! That would be a good way to conserve energy and strengthen your marriage!”

Apparently math and logical thinking aren’t my strong suits.

black tile kitchen yellow floral wallpaper.jpg
IMG_2453.jpg
black tile kitchen yellow floral wallpaper grand rapids interior designer.jpg

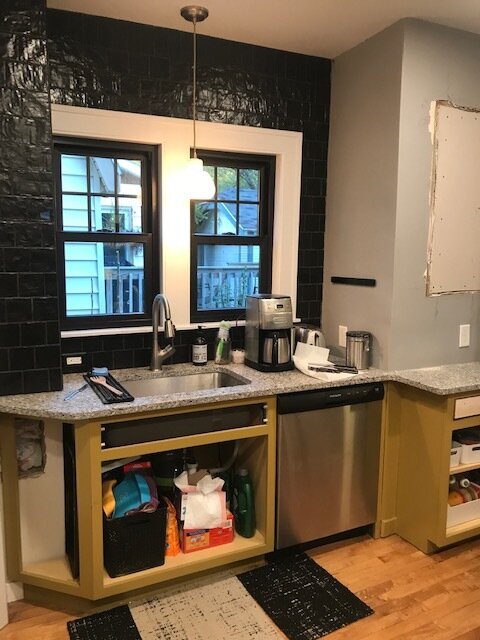
We started with a kitchen that wasn’t terrible…it had new cabinets and countertops from the previous owners, so I did not want to rip everything out.

I wanted to add just a little bit of personality to make me happier about being a short order cook for three of the world’s most demanding restaurant patrons.

black tile kitchen yellow floral wallpaper.png
IMG_2455.jpg

The bathroom was right next to the kitchen, and had pretty ugly paper-like linoleum floor, and no other personality.

The mudroom was nice if you ignored the barnwood….and happened to be a family of one and needed zero storage space.

Disclaimer: Just like I don’t know the meaning of the number one, I also don’t know the meaning of ‘a little personality’.

So without further ado…Behold, (per my husband): The Gaudy Grandma Kitchen

I prefer “Eclectic, Modern-Vintage Kitchen”, but what are you gonna do? (He did upgrade me to Gucci Grandma Kitchen by the end of it).

Waiting for my Gucci sponsorship to come through…

Glass open shelfs kitchen gold brass brackets black zellige kitchen backsplash yellow floral wallpaper.jpg
Glass open shelfs kitchen gold brass brackets black zellige kitchen backsplash.jpg
Glass open shelfs kitchen gold brass brackets black zellige kitchen backsplash yellow cabinets.jpg

As you can see, we removed the window by the bathroom door and had it drywalled, and installed some open shelving. This kitchen was not only boring, but also had zero storage.

We tiled the backsplash, counter to ceiling with black zellige type tile from Tile Bar.

Yellow built in banquette bench black and white channel tufted banquette seating.jpg
Built in bench banquette with drawers channel tufted banquette tulip table.jpg

Then, to create MORE storage….and a cozy place to hang out, we had our friends at Re.dwell build us a banquette bench with drawers underneath. That’s six feet of premium kitchen storage folks.

It would be a tight fit, but I could fit at least two of my kids under there if need be.

I had a banquette plan for this space when we bought the house, so I bought the marble table from World Market & the lucite chairs from CB2. The light fixture is the FL/Y pendant from Kartell and helps make the sapce!

Vintage floral wallpaper modern lucite lamp.jpg

I took my upholstery skills to a whole new level and upholstered the bench giving it a built in upholstered look with a channel tufted back in some crazy, modern, black and white fabric from Spoonflower.

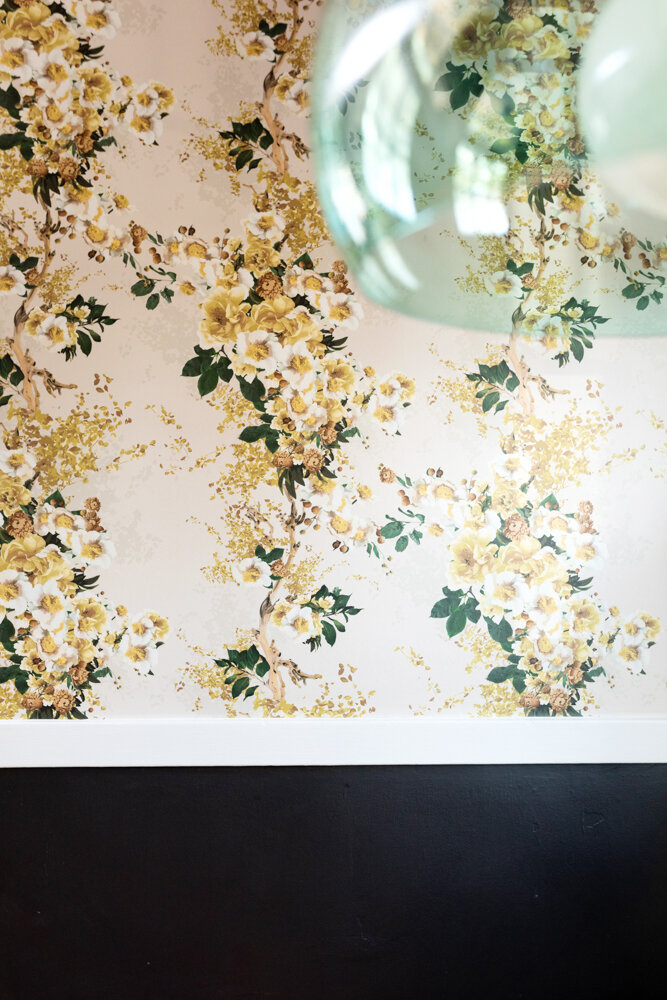
The yellow floral wallpaper from Drop It Modern was something I loved (yellow being my favorite color), but was a bit nervous about. It may not be everyone’s cup of tea, but I loveeeee it.

1. yellow vintage floral wallpaper kitchen black doors grand rapids interior designer.jpg
 
SwattsCo_ORC-20_web (1).jpg
1. mustard yellow kitchen cabinets black zellige tile backsplash yellow vintage floral wallpaper.jpg

Originally, I was planning on painting lower cabinets a dark green, but made a decision midway through the process and decided to go with a yellow tone from the wallpaper. Yellow being my favorite color and all.

2. glass kitchen shelves brass brackets white and black bathroom.jpg
2. Black and white malachite wallpaper square subway tile dark grount bathroom.jpg

The bathroom design was based on leftover tile we already had from our previous projects. We did a 2” matte black hex tile on the floor and 4” square white subway on the walls. And then because I couldn’t contain myself, black and white malachite wallpaper on the walls and ceiling from Cole & Sons.

2. gold bathroom mirror black and white malachite wallpaper square subway tile.jpg

When the door is open, the black and white wallpaper makes a play with the black and white upholstered bench back in the kitchen. It’s not the same matchy-matchy, but it’s not all that different.

black+and+white+malachite+wallpaper+bathroom+walls+wallpaper+on+ceiling+gold+mirror.jpg

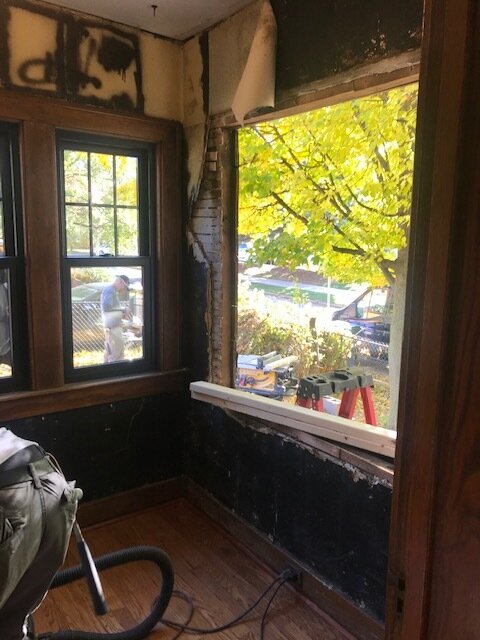
For the mudroom, we had the barnwood walls removed, and installed drywall, took out one of the windows, so we could install floor to ceiling cabinets.

I can definitely fit all 3 of my children in these cabinets…

3. black cabinets black cabinet pulls.jpg
3. black floor to ceiling cabinets black pulls black and white rug mudroom storage.jpg

In the mudroom we did Ikea cabinets with Semihandmade fronts. Black pulls are from Belwith-Keeler. It isn’t hard to put together Ikea cabinets, but it did come with a little bit of PTSD from our last Ikea project.

We still have the countertop to install and some shelving in the mudroom, but it’s pretty much done.

grand rapids interior designer eclectic design yellow vintage floral wallpaper in kitchen black walls.jpg

Thank you so much to all of you for your cheerleading while we worked to finish this project. Seeing your excitement made me work harder to get all these projects finished on time.

glass open shelving in kitchen brass gold brackets.jpg
0. Grand Rapids interior designer modern vintage kitchen built in banquette seating.jpg
Yellow floral kitchen wallpaper black zellige tile backsplash open glass shelving gold brackets built in banquette bench.jpg
0. Floral Kitchen wallpaper kitchen wall organizer.jpg
brass and gold kitchen faucet black kitchen backsplash grand rapids interior design.jpg
black kitchen backsplash black windows white trim in kitchen.jpg
Mustard yellow kitchen cabinets floral wallpaper geometric black and white rug.jpg
black kitchen backsplash glass shelving gold brackets.jpg
mustard yellow kitchen cabinets two tone kitchen yellow floral wallpaper grand rapids interior designer.jpg

It was SO much work and I’m really tired (and my husband is tired of all the house projects), but I’m super thankful for the push to get it done.

I don’t think he reads my blog, but if he does…I’m finding out if he reads to the end of my blog….a big, huge, tremendous, thank you to my husband for being a good sport and tiling everything, installing pulls, trim, and almost anything else he did throughout.

He complained a lot, and he’s leaving tomorrow on a fun trip for a week “in payment” for his work, but I wouldn’t have been able to do it without him.

As always….don’t forget to check out all of the other guest designers here and the amazing featured designers of this season.

If you want to see the whole process click on the below links for week to week progress.

Week One I Week Two I Week Three I Week Four I Week Five

Week 5 One Room Challenge: Modern Vintage Kitchen in Grand Rapids, MI


Week 5 One Room Challenge: Modern Vintage Kitchen in Grand Rapids, MI

Here I am posting a few days late. We had a client presentation for a big project this week (it’s going to be amazing, and I can’t wait to show it to you…in like 8 months), and that means that our own projects go on the back burner.

see the pretty new windows!??

see the pretty new windows!??

I can only imagine how long this project would take us if we didn’t have the ORC to give us a kick in the butt.

SO! Week 5! Big things happened this week!.

We had new windows installed! We actually ended up getting new windows throughout the whole house which is exciting since the original ones were literally a hundred years old. Winter will be more enjoyable now.

grand rapids interior design removing window for shelf space.jpg
grand rapids interior design removing window for shelf space (2).jpg

We also had them remove the window in the kitchen and frame it in. Same for the window in the mudroom. The mudroom won’t be all finished by next thursday as they can’t install the cabinets until thursday….but considering that’s my third room in this seasons one room challenge, I don’t feel too bad about finishing that room late.
grand rapids interior design removing window for shelf space 3 mudroom makeover.jpg
Mudroom entry makeover drywall over windows for more cabinet space.jpg

My hot tile guy finished up tiling over that wall where the window used to be. He gets to grout this weekend and the tile will be completely finished!

counter to ceiling black tile backsplash with dark grout grand rapids interior design.PNG

I’ve started working on upholstering for the banquette bench. I’m totally making it up as I go along. No idea how to really upholster for a built in upholstered look, and so I’m winging it with my trusty stapler.

grand rapids interior design bench upholstering.PNG

I haven’t decided if I should paint the two doors in the kitchen black or not. I prefer dark doors to white, but 1) I’m not convinced I’ll love it in this room 2) I’m running out of time.

Since I’m running out of time, I thought maybe I would add one more things on my list and paint the mudroom ceiling the color of the kitchen cabinets. It remains to be seen if that actually happens.

built in banquette upholstered bench black leather seat black interior windows.JPG

I got lulled into thinking “we are almost done, we’ve totally got this!”. And then we made a to-do list last night and I was reminded we still have so much to do in order to have a finished room.

  • Grout tile

  • Hang shelves on tiled wall (drilling into tile can be a pain in the butt)

  • Install new kitchen faucet

  • Finish upholstering banquette bench and back (no idea how long this will take)

  • paint trim to finish trimming bathroom

  • smooth wall to prepare for wallpaper…(we ripped off a chair rail)

  • Hang cabinet doors

  • Install all cabinet hardware

  • Put together Ikea cabinets for mudroom

  • Potentially paint mudroom

  • maybe paint kitchen doors.

Who wants to come over and do some projets?? Anyone? Bueller??

ORC.Logo.jpeg

Don’t forget to check out the progress from the other guest participants in this seasons one room challenge and also some of the super fun stuff that the featured designers are doing!


Black Mid-Century Modern House Reveal


Black Mid-Century Modern House Reveal

It’s taken a while (like 4 years) to share the official reveal of our Project Sunset Lake Boulevard exterior….but it takes awhile to share everything, so better late than never.

“Before”

“Before”

This house was a pretty boring ranch house but had some good mid-century lines to work with. We knew from the very beginning we were going to paint the house black. A contractor suggest a dark grey instead of black, and my response was “gray is for pussies”.

“After”

“After”

Just kidding. That wasn’t my response, but I wanted it to be. I’ve just been very, very, very, over the 50 shades of gray that has taken over the world since the late 2000’s.

Benjamin Moore Snow Cone Green Front door with black house.jpg

So here are the deets!

  • Siding: Cement Hardie Board siding on left and cedar lap siding on right

  • Siding Paint Color

    • Cement Siding (left side of house) is painted Sherwin Williams Black Magic in Satin

    • Cedar lap siding (right side by garage) is painted Sherwin Williams Black Magic in Flat

  • Front Door Paint Color

    • Snow Cone Green by Benjamin Moore

  • Garage Door/Cedar Siding

    • Tongue and groove clear cedar with Cabot stain in Natural

  • Windows: From Sierra Pacific (not sure how much I would recommend them though)

  • Address Numbers from Etsy

  • Door Mat from Target.

Mid-Century Modern Black House with Cedar garage door cedar siding (2).jpg
Black Hardieboard siding Sherwin Williams Black Magic.jpg
Mid Century Modern House Rock Cairn.jpg

The most common question we get asked about this project is the garage door. The garage door is just a standard metal garage door with tongue and groove cedar panels glued to to each panel of the door.

While it wasn’t the cheapest garage door, it wasn’t too crazy to get this look. I believe we paid about $2k for the clear cedar that went on the door (plus the cost of the door).

cedar garage door black house.jpg
Black Hardie board siding cedar siding mid century house.jpg

And that’s about it! To see the before and after of the backyard exterior, click here

If you have any questions, leave one in the comments!


Week 4 One Room Challenge: Modern Vintage Kitchen


ORC Week Four: Modern Vintage Kitchen Update

It’s week four of the One Room Challenge. And I’m being reminded again why it’s a challenge.

To see the previous weeks, click below:

Week One I Week Two I Week Three

ORC.Logo.jpeg

This is gonna be a short one because no one wants to read in detail about the millions of coats of paint that I painted on our kitchen cabinets.

It was 3 actually…on each side….which meant 6 nights of painting after the kids went to bed which means I’m tired and annoyed now.

finished doors…look better in photos! The color is BM 280 Renaissance Gold

finished doors…look better in photos! The color is BM 280 Renaissance Gold

Annoyed especially because I probably should’ve sprayed the cabinets or paid someone to spray them. But I was being lazy and cheap, and I rolled them and…well, I’ve done better work.

built in banquette bench with drawers one room challenge.jpg

The exciting part of this week was our banquette bench was installed! It has drawers! This means 6 feet of storage space under there. HUGE drawers. Can you imagine all the rubbermaids I can store under there??!

Yes, I’ve reached that point in my life where I get excited about rubbermaid storage.

I also am pretty excited to see what it’s like when I reupholster it. Assuming I figure out HOW to reupholster it.

built in bench banquette with drawers black marble tulip table lucite chairs.JPG

The husband also finished the top row of uneven tile- you can still tell that ceiling is unlevel, but since we did a vertical stack with 2x8 tile instead of continuing the 4x4 tile, it’s less noticeable…and I almost have myself convinced it looks like we planned to do a tile border at the top.

When the window on the right is removed, he can finish tiling across that wall and install some shelves!

Mustard Yellow kitchen cabinets Benjamin moore Renaissance Gold 280 Black zellige subway tile backsplash grand rapids interior designer.JPG

I think we are also going to use a dark grout instead of white grout so that the uneven ceiling is less noticeable. I have mixed feelings about this because I had been planning on light colored grout. TBD.

And. That’s about all we’ve done!

To see the rest of the guest designers progress, click here! To see what all the featured designers are up to, click here!


Modern Vintage Kitchen Makeover Fall ORC: Week Three


Week Three ORC: Fall 2020

We are at the halfway point of the One Room Challenge and I’m ready for a vacation. (To see previous weeks, click below)

Week One I Week Two

Okay, I was a ready for a vacation prior to the start of this. But now I’m extra ready.

My husband is as well. He’s making a dent on this bottle. But really I wanted you to see a close up of the new tile.

My husband is as well. He’s making a dent on this bottle. But really I wanted you to see a close up of the new tile.

The crazy part thing is, that it’s going to be way busier the last few weeks because we’ve done almost everything we can do until our windows go in on Nov 2/3rd. Then it’s going to be a race to finish everything in time for the end of the challenge.

Not to be all cynical, but I honestly don’t know if we’ll make it for the initial “reveal” date of Nov 12th. (but technically we have an extra grace week, but my husband doesn’t know that and he doesn’t read my blog, so don’t tell him!)

So! What we’ve been doing in the past week!

The husband has been hard at work doing the tile backsplash in the kitchen.

All of you who think he’s just the best husband ever to do all my dirty work….not only does he get paid in sex as I mentioned last week, but the real reason he’s been working so hard is so he can go on a climbing trip this weekend with his friends.

Sex as payment was a distant 2nd place prize when compared to a climbing trip. So, don’t you be feeling bad for him.

Black square zellige kitchen tile backsplash modern vintage kitchen grand rapids interior designer.jpg

We’ve done as much tile as we can do until the window on the right side of the wall is removed and drywalled over.

We’ve come across a little snag in this tile job as the ceilings in our 100 year old house are extremely out of line….to the tune of 3/4” unlevel in only a span of 5 feet of ceiling. We’re going to have to get creative how we address the top 6” of space for tile.

But creativity is the name of the game around here. Sadly, I might have to do dark grout instead of light grout like I was planning. The white will only high light all of the level issues…we shall see!

black square zellige tile kitchen backsplash yellow lower cabinets DIY painting kitchen cabinets.jpg

I’ve started the painting process for the cabinets. Stay tuned for a cabinet painting tutorial.

I hate hate hate the sanding and prep process. I managed a crystal glass finish on the table I painted for the spring ORC, so fingers crossed I can do the same for the cabinets.

Painting kitchen cabinets DIY interior design.jpg

I’ve also got the bottom part of the wall under the chair rail painted with a winning color. (Which is black…what a shocking surprise coming from me, I know.)

I really tried to do something different but I am not cool enough to pull it off.

Originally, when the cabinets were going to be green, I was going to do the lower section a shade of green different than cabinets. But then I changed to yellow cabinets and I definitely didn’t want to do the lower wall yellow.

Benjamin Moore Bayshore Beige.jpg

So I picked out a color from the wallpaper and got some samples with ‘beige’ in the title and thought that I was going to bring back beige.

Newsflash. I will not be bringing back beige. That will have to be someone else’s job. It could’ve worked if the floors were very dark, almost black or a gray. Definitely did not work with my floors.

Sherwin Williams Black Magic Matte Paint color.jpg

So I went with what I knew…which conveniently was in my basement, and that was Sherwin Williams Black Magic (the same color as the exterior of our last house).

The color makes my heart happy, which says a little something about the color of my heart. (I got real excited about the addition of the black heart emoji on my phone).

Doesn’t it make you feel better too?

Stay tuned! We have all of this coming up!

Still to do:

  • Banquette bench installation

  • upholster bench

  • paint bench

  • new windows

  • Tile over old window location

  • hang open shelving

  • wallpaper.

ORC.Logo.jpeg

To follow along with all of the other guest participants doing the One Room Challenge, click here.

The featured designers are doing some pretty cool virtual stuff here!


Custer State Park, South Dakota: Family Road Trip


Custer State Park, Rapid City, South Dakota

This is the 1st detailed post from our baby/family friendly road trip post the other week. If you want the overview, head over there!

Legion Lake Campground

We planned one really long haul on the way out there to get us out corn-field land (sorry all you fellow midwesterners) and left Grand Rapids, MI around 5pm on a Thursday and made it to Rapid City, SD around 11am/12pm the next day.

Our very nice, grassy campground site.

Our very nice, grassy campground site.

I’ve never been that big of a fan of state parks because they are usually crowded and there’s no privacy.  But what you lose in privacy, you gain in amenities…so I get the appeal.

You also gain grass sometimes, which is God’s gift to every mother forced to camp with a 12 month old who isn’t walking yet and likes to roll around in the dirt.

I actually really liked Custer State Park- we stayed in the Legion Lake Campground, chosen because it was literally the ONLY site available when we called from the road at 10am to reserve a spot for that evening.

The beach at Legion Lake: Custer State Park

The beach at Legion Lake: Custer State Park

Despite the fact it was all dumb luck we stayed here, I would stay there again in a heartbeat- it is an absolute great place for kids.

We lucked out- the campground wasn’t huge or too crowded, and it was across the street from a lake with a beach and the first playground my kids had been able to play on in months (covid sucks).

Bonus points for the restaurant/patio on the lake that served alcohol and saved me from having to cook dinner. (now you’re all understanding why I would stay there again!)

The needles highway- SOO COOL!

The needles highway- SOO COOL!

The Needles Highway

The next morning, we took the drive through the needles highway (a must DO if you’re not in a large RV). 

My husband spent the time pointing out all the rocks he climbed to our kids.  Not sure they were impressed. 

We took the needles highway to Mount Rushmore, and did a quick walk through.  If you have a stroller, you can only do a short portion of the hike to the viewpoint below in our picture, but it was sufficient for what we were looking for since we had more planned for the day.

Mount Rushmore Kid Friendly Family road trip.JPG

Focus on the monument and not on the husband’s mustache. In 20 years, he’ll probably still be defending it.

Devils Tower, Wyoming

We left Mount Rushmore and drove the 2-3 hours to Devils Tower in Wyoming.  We had been there previously years ago to climb- but it’s still pretty cool to see a 2nd (or 3rd time).  Bonus that you can take a stroller the whole way around the base of the tower.  With two kids (3 & 6) walking, it only took us an hour or so to hike around the base.

Devils Tower, Wyoming

Devils Tower, Wyoming

It’s definitely worth a stop!

Be prepared with some tissues to hand out when your 6yo gets really sad and cries because she feels bad for the trees who got burnt in a fire long ago.

Also be prepared with some tissues for the husband when he gets really sad because he’s pushing a stroller around Devils Tower instead of climbing to the top of it.

A fact that I pointed out many times because I’m evil and I can’t help myself.

There is a KOA at the bottom of Devils Tower, but it isn’t that cool and it’s pretty expensive, so if possible, I would recommend staying elsewhere.

Devils Tower

Devils Tower

Bighorn National Forest

We continued on in the car for a few more hours and found a spot to camp in the Bighorn National Forest.  This was a 180 from our previous night campground.  You can camp wherever you want in a national forest for free- you just have to find a spot.  It was getting dark, so we pulled off on a forest service road and found an open area flat enough for our set up. 

IMG_0661 (1).JPG

Not gonna lie- I like me a hot shower, but it’s pretty cool being out in the middle of nowhere with absolutely no one around.  Not so cool when you think about the bear possibility, but the benefit of being able to sit the foggy potty right there outweighed the risk of bears.

The funny thing is, from the pictures I took- our campsites in the state park and the national forest look similar, but they’re totally different. It was a gorgeous area!

Stay tuned for the continuation of our trip into Yellowstone!